Hi everyone!
Here's something special that I made for my boyfriend on his new job. Technically, he's been working at this job for 6 months already but it's only as a temp. and now he's officially a part of the company. Able to get the benefits and everything and I'm so proud of him!
Anyways, with a long distance relationship, it's pretty hard to send stuff, especially bake goods. So I thought, why not make Rice Krispies, right?
Showing posts with label Dollar Crafts. Show all posts
Friday, January 31, 2014
Saturday, December 14, 2013
DIY Personalize Christmas Ornament
Hi everyone! For today's blog post, I made a DIY Christmas gift. It's super cheap, super cute, and very easy to make and to give it to all your friends and family. I call it a DIY Personalize Christmas Ornament.
Items I used:
- Clear ornaments from Walmart for a dollar each
- Gold star confetti from Walmart for a dollar as well
- Blank note cards, you can use plain white paper as an alternative
- The origami was made from wrapping paper
- Gold metallic sharpie
- Bells
- Gift tags
You can put anything you want, of course. Make it your own unique ornament, personalize it, and put items that reminds you of the special person you're giving it to.
For example, I cut up note cards into small strips and wrote things that things that represent my friends, like , "You're such a hardworking, loving person that I know you'll go far!" I also add dates of things I've done with my friends, like all the trips we went together or dates of celebrations. I also threw in fortunes that represent my friends from fortune cookies and other things.
Again, make it meaningful and personalize it with your own creativeness! They make great little gifts and they can be reused over and over with different personalize items throughout the years. You can also bring in a new holiday tradition and have everyone in the family make one and put things that makes them thankful for Christmas or all the great achievements and events that was meaningful to them in this year.
Happy holidays and see you again soon!
Items I used:
- Clear ornaments from Walmart for a dollar each
- Gold star confetti from Walmart for a dollar as well
- Blank note cards, you can use plain white paper as an alternative
- The origami was made from wrapping paper
- Gold metallic sharpie
- Bells
- Gift tags
You can put anything you want, of course. Make it your own unique ornament, personalize it, and put items that reminds you of the special person you're giving it to.
Again, make it meaningful and personalize it with your own creativeness! They make great little gifts and they can be reused over and over with different personalize items throughout the years. You can also bring in a new holiday tradition and have everyone in the family make one and put things that makes them thankful for Christmas or all the great achievements and events that was meaningful to them in this year.
Happy holidays and see you again soon!
Monday, August 12, 2013
DIY 21st Birthday Hangover Kit
Hello everyone!
So, my boyfriend is turning 21 very soon! How exciting! Therefore, knowing what people do when they hit that age, I'm thinking folks party hard for their 21st birthday, right? Well, his friends are throwing him a big celebration and so just in case I wanted to make him a "Hangover Kit" just for that occasion.
It's very simple and my hangover kit probably cost less than $20 altogether. Maybe even less than $15! Majority of the items I bought were from the dollar store! I love that store! Anyways, here's the items I added in my basket.
Like I mentioned earlier, majority of these items were from the dollar store. A few items like the first aid kit and the mouthwash was from the Walmart's travel section. The t-shirt was purchased at the clothing store, Rue 21.
The basket and ribbon was from the dollar store as well! I also made a "Get Well Soon" card because I thought that's hilarious. Here's how it looks unwrapped!
And here's how it looks all wrapped up in a gift basket.
There you go! That's my DIY Hangover Kit! I hope you all like it! Of course there's many more things to add in a hangover kit! Other things that I wanted to add was gum, sunglasses, a sleeping mask, an eye drop, and so much more! But I realize that my basket was getting too full and so I just had to stop spoiling him!
Anyways, feel free to comment! Thank you for stopping by! Have a great day!
So, my boyfriend is turning 21 very soon! How exciting! Therefore, knowing what people do when they hit that age, I'm thinking folks party hard for their 21st birthday, right? Well, his friends are throwing him a big celebration and so just in case I wanted to make him a "Hangover Kit" just for that occasion.
It's very simple and my hangover kit probably cost less than $20 altogether. Maybe even less than $15! Majority of the items I bought were from the dollar store! I love that store! Anyways, here's the items I added in my basket.
A water bottle,a Gatorade, Chewy bars, raisins, chicken noodle soup, tissues, a little first aid kit, Vaseline, Advil, Tums, mouthwash, a little bottle of hand sanitizer, and a t-shirt that says "Wasted"
Here's the t-shirt! When I first saw this I thought this is a must have for his 21st birthday party! Especially if the birthday boy doesn't want to admit that he's the one whose "wasted" at his own party. Ahah!
The basket and ribbon was from the dollar store as well! I also made a "Get Well Soon" card because I thought that's hilarious. Here's how it looks unwrapped!
And here's how it looks all wrapped up in a gift basket.
There you go! That's my DIY Hangover Kit! I hope you all like it! Of course there's many more things to add in a hangover kit! Other things that I wanted to add was gum, sunglasses, a sleeping mask, an eye drop, and so much more! But I realize that my basket was getting too full and so I just had to stop spoiling him!
Anyways, feel free to comment! Thank you for stopping by! Have a great day!
Friday, August 2, 2013
DIY Pokeball Candy Gift
Hello everyone!
I know it's been awhile since I have updated this blog but I have been busy with my summer such as traveling around, spending lots of money, spending time with family and friends, and so on. I have been extremely busy in the past month because my boyfriend (who I have not seen in a year!) came to stay & visit! We had such a blast while he was here!
Anyways, today's blog post is about a DIY Pokeball candy gift that I have previously made for my boyfriend's birthday. It was a hit with his friends and family and so I've decided to post it here for everyone.
It's very simple. The plastic ball was bought from Party City for only a dollar! I then bought candies to fill the ball (or you can fill it with other goodies!). First, cut a trim of black construction paper to wrap around the ball. Then cut card stock paper and color it according to the picture above to add the finishing touch and that's it! Simple and fast! I think this is also a great party favor for a Pokemon themed party!
Enjoy everyone! Have a wonderful day!
I know it's been awhile since I have updated this blog but I have been busy with my summer such as traveling around, spending lots of money, spending time with family and friends, and so on. I have been extremely busy in the past month because my boyfriend (who I have not seen in a year!) came to stay & visit! We had such a blast while he was here!
Anyways, today's blog post is about a DIY Pokeball candy gift that I have previously made for my boyfriend's birthday. It was a hit with his friends and family and so I've decided to post it here for everyone.
It's very simple. The plastic ball was bought from Party City for only a dollar! I then bought candies to fill the ball (or you can fill it with other goodies!). First, cut a trim of black construction paper to wrap around the ball. Then cut card stock paper and color it according to the picture above to add the finishing touch and that's it! Simple and fast! I think this is also a great party favor for a Pokemon themed party!
Enjoy everyone! Have a wonderful day!
Thursday, June 20, 2013
Happy Father's Day!
Hello everyone!
I hope you all had a wonderful Father's Day celebration with all of your love ones. I know it's a couple days past Father's Day already but I wanted to share some of the things that my family did for my dad this past weekend.
1. Dad's To-Go Gift Caddy
I hope you all had a wonderful Father's Day celebration with all of your love ones. I know it's a couple days past Father's Day already but I wanted to share some of the things that my family did for my dad this past weekend.
1. Dad's To-Go Gift Caddy
Now, if you're as broke as I am, you understand that these holidays are killing us! But, out of love, we still would like to make our love ones happy. Therefore, it's time to head to the dollar store! And hey, they got some nifty stuff. I do my shopping at the dollar store all the time!
Items: a caddy, Father's Day card, a sponge, a towel, popcorn, a Dad's drink, and Snickers chocolate bars
Now you might be thinking, what a weird combination. Well, the idea is that our dad can enjoy watching his movie (kids-free) with the popcorn, drink, and chocolates while the kids go out with the sponge and towel to wash his car.
See, as you can see we also included a "One Free Car Wash From Your Kids" coupon. The gift turned out great! And us kids had a great time washing the cars.
2. Chocolate Strawberry Cake topped with Hershey's Milk Chocolate with Almonds
My family loves strawberries and so I made sure that the first layer was covered with strawberries!
Then top the strawberries with cream cheese filling!
Make sure to spread the cream cheese around.
Then cover it with another layer of cake. Cover the top with cream cheese again. Then make sure to cut the chocolate bars into pieces and place it on top of the cake for the finishing touch.
And viola! Here's the cake that we made for my wonderful dad!
It was oh-so-yummy!
Thank you for taking the time to read this post! Happy Father's Day to all! I hope you all had a great one!
Have a great day everyone! Feel free to comment! Also, don't forget to follow Variety o' Variety on Pinterest! Thanks!
Thursday, June 6, 2013
DIY Seashell Makeover - Light Switch and Outlet Covers
So I've been decorating my bathroom along the "beach theme" and it's been progressing wonderfully! I've painted the entire bathroom, added personalized picture frames, added seashells and white beach sand to the bathroom, and put some personalized jars that's filled with sand and seashells on the counters. I would love to show you all pictures, but that's another blog for another time!
Today's DIY project are my light switch and outlet covers that I redecorated in seashells! It turned out even better than I expected!
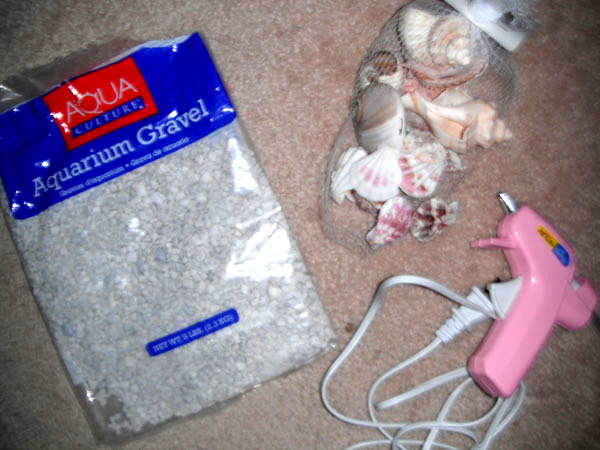
So how to turn a plain o' light switch cover and an outlet cover into this? Well, these are the items you'll need:
1.Seashells. Can be bought from the dollar store.
2. Aquarium gravel. Can be bought at Walmart or the pet store for an affordable price. You'll need these tiny rocks to fill in the white spaces on the covers.
3. Hot glue gun. Can be bought cheap at Walmart or a craft store.
So here's the steps:
1. Of course, you'll need to take the covers out.
2. Take out all of the seashells from the bag and choose your likings. Make piles of the small seashells and big seashells. Most likely, you'll used almost all of the small ones because you want to be considerate and remember that you'll have to screw the covers back on and you want to make sure there's room for the light switch to turn on and off, and it's kind of hard to select all of the big seashells. But you can apply some of the larger ones on the corners of the covers.

3. Before you actually start gluing all of the seashells on the covers, make sure to plan and play around with the shells to see how you'll like it.
4. Next, start hot gluing! How fun! Some of the shells, like the flat ones, I call it, but also have other names like the Lion's Paw, Scallop, Pecten Raveneli, you'll want to glue the outline/edges of the insides.
5. Make sure the shells stay in place! Gently hold/press the shells for a few seconds and make sure it's stable, otherwise, hot glue it some more!
6. After you have glued all of the seashells, you'll then see all of the empty spots that needs to be covered. That's where the aquarium rocks come in handy. They're tiny enough to fill in all of those smaller spots where smaller rocks or shells might not be able to fill.
7. Repeat step 5 for the aquarium rocks and make sure they stay in place. They're smaller and more fragile for the glue to stick them in place. So gently holding them in place will surely make them stick on.

8. Again, make sure you remember that you'll have to screw the covers back. So you don't want to glue too much around switch lights or the screws. This happened to me, and I couldn't put the screws in because a shell was in the way or some of the rocks were too close to where I had to screw the covers back. In the end, I had to remove some of the little rocks and had to re-glue it again. But they still turned out lovely!
9. Do the same process for all of your covers!
And here's my outcome:
They look great, right? Not bad for my first time, I'll say! I love 'em!
Here's the final look!
Thank you so much for taking the time to read! I hope to see your DIY Seashell Makeover creations as well! Please leave a comment! Thanks!
Sunday, June 2, 2013
Three Bridal Shower Signage Stationery Ideas
Hello everyone! I hope you are all doing well.
Yesterday, I just threw a bridal shower for my dear cousin who is getting married in two weeks! If you're struggling with what signage stationery activities to do at the bridal shower then here's some of my activities that we did at my cousin's bridal shower.
1. Date Ideas
I used a Mason jar and decorated it with a ribbon and a label that said "Pick One! Date Ideas." Then I used plain index cards and cut them into strips. Guests are able to leave the bride and groom funny, romantic or wild date ideas on the paper strips. For example: "Go on a romantic stroll in the park," "Go skinny dipping in the dark," or "Go bar hopping."
This is such a neat idea for the bride and groom for whenever they are bored of their daily routines or just ran out of ideas on what to do on their next date. They can simply pick a date idea from the jar! They will never have another boring date again! So cute!
2. Words of Wisdom/Best Advice for the Bride
Another thing that we had guests participated in at the bridal shower was sharing their advice and wisdom for the bride.They would write on note cards and insert it in a box. Then when everyone had a chance to write something, turn it into a little booklet or keep it in the box and presented to the bride. It's also fun to say it out loud and share with everyone!
3. "Guest Board" instead of a Guestbook
So I know this is pretty early to have before of the wedding, but with I just couldn't help myself and had to make one for the bridal shower. Also, knowing that some of our friends and family are only able to attend the bridal shower or the wedding, I wanted to make sure that everyone had a chance to sign the board. I drew the groom and bride's name on a board that you can get super cheap, like a $1 at the Dollar Store or at Walmart, and also added their wedding date on the bottom. At the bridal shower, we had guests signed the board. There was still a lot of room so we'll use it again at the wedding!
Everyone loved the board and it's way better to display than a guestbook where you'll probably rarely go through it again. But with a board you can display it and even frame it for all of your guests to see it in the future.
Thank you for reading!
Yesterday, I just threw a bridal shower for my dear cousin who is getting married in two weeks! If you're struggling with what signage stationery activities to do at the bridal shower then here's some of my activities that we did at my cousin's bridal shower.
1. Date Ideas
I used a Mason jar and decorated it with a ribbon and a label that said "Pick One! Date Ideas." Then I used plain index cards and cut them into strips. Guests are able to leave the bride and groom funny, romantic or wild date ideas on the paper strips. For example: "Go on a romantic stroll in the park," "Go skinny dipping in the dark," or "Go bar hopping."
This is such a neat idea for the bride and groom for whenever they are bored of their daily routines or just ran out of ideas on what to do on their next date. They can simply pick a date idea from the jar! They will never have another boring date again! So cute!
2. Words of Wisdom/Best Advice for the Bride
Another thing that we had guests participated in at the bridal shower was sharing their advice and wisdom for the bride.They would write on note cards and insert it in a box. Then when everyone had a chance to write something, turn it into a little booklet or keep it in the box and presented to the bride. It's also fun to say it out loud and share with everyone!
3. "Guest Board" instead of a Guestbook
So I know this is pretty early to have before of the wedding, but with I just couldn't help myself and had to make one for the bridal shower. Also, knowing that some of our friends and family are only able to attend the bridal shower or the wedding, I wanted to make sure that everyone had a chance to sign the board. I drew the groom and bride's name on a board that you can get super cheap, like a $1 at the Dollar Store or at Walmart, and also added their wedding date on the bottom. At the bridal shower, we had guests signed the board. There was still a lot of room so we'll use it again at the wedding!
Everyone loved the board and it's way better to display than a guestbook where you'll probably rarely go through it again. But with a board you can display it and even frame it for all of your guests to see it in the future.
Thank you for reading!
Sunday, April 28, 2013
DIY Plant Terrariums
Hello everyone!
I always wanted to make this and since Mother's Day is nearing I decided to make some because my mom loves plants. I also decided to make some for a dear co-worker of mine who is retiring this summer.
- Glass jars
- Soil
- Small white rocks
- Variety sizes of all kinds of rocks
- Plants
- Activated charcoal (Optional)
- Decorations (Optional)
Step-by-step instructions:
1. Get some clean glass jars. Glass jars can be bought in almost any stores. I bought all of mine from the dollar store and the bigger jars and Mason jars were from Target and Walmart.
2. Get your potting soil, white rocks, and other rocks ready. I bought my potting soil under a dollar at Walmart and I also got my white rocks from there as well. I got my other rocks from the dollar store.

3. I bought all of my plants under $3 from Walmart as well. Majority of the plants I bought were fern, ivy, bush, and other small house plants that can fit into the small jars that I bought. It worked out wonderful. I had enough plants for all of my jars. I was worried that some plants might be too big to fit into the jars but when you start to take out the plants from their original pots and soil some of the plants separated.
4. Take the plants out of their pot. Make sure to take out all of the soil down to the roots as much as possible. Do the same process for all of the plants.
5. Pour in the white rocks in the pot first.
6. Second, pour in soil but not so much that it cover the entire pot because you'll need room for your plants, rocks, and other decorations. Also, I've read that others use activated charcoal to help clean and sustain the water but I didn't use any. Although you are more than welcome to use it and should pour it in after you pour in the white rocks and before you pour in the soil.
7. Put your plants in gently. Then fill the pot with more soil to cover up the plant's roots.
8. Then place some rocks on top to finish the look. All kinds of decorations can be added as well.
For example, I added ropes, I used cupcake toppers, and made some of my own cut-outs. I wrote down all of the plant's name on the cupcake toppers and cut-outs that was placed in the pot so I wouldn't forget what kind of plants they were.
Happy DIY plant terrarium making! Feel free to share some of your ideas or your own plant terrariums!
Subscribe to:
Posts (Atom)